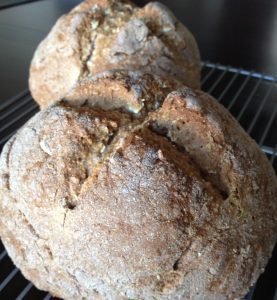
I would be lying if I say that this recipe is so easy to make with few steps. Rather they take three days to make and need loads of patience and butter. Those who faint at the sight of butter need to look elsewhere as there is no low-fat croissants recipe anywhere and if you happen to find then it must be something else all together. The definition of croissants is butter, labor of love and patience.
I need to confess that I was slightly intimidated that I won’t be able to make croissants, consider it as some kind of mental block as I thought patience is not my virtue. Hell! I didn’t have a clue what patience meant until I had my first baby, she gave me an insight of what patience meant. I seldom posses them but I try in levels I’m comfortable to live with, I’m no saint when it comes to that department. But being a part of the We Knead to Bake group we were asked to make croissants this month and when I didn’t want to be the one left out, I set out to try. I’m so happy with the results and surprised at the new levels I’ve reached with patience .

The recipe is quite forgiving as I was short of 1/2 tsp of yeast the ingredients required and I couldn’t find any difference with the way the croissants turned out. Now with my new-found confidence I’ll try with some fillings in the near future. Any ideas for fillings?
Recipe adapted from Finecooking.com
Step-by-Step Pictorial:
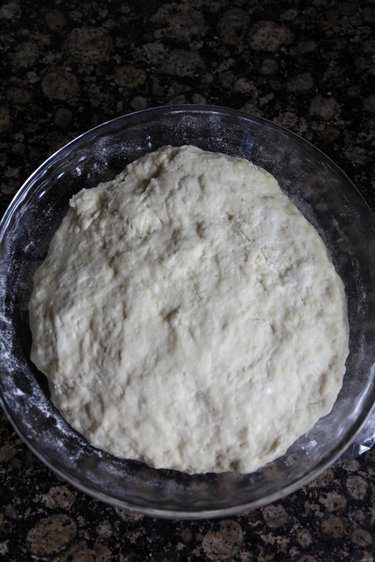
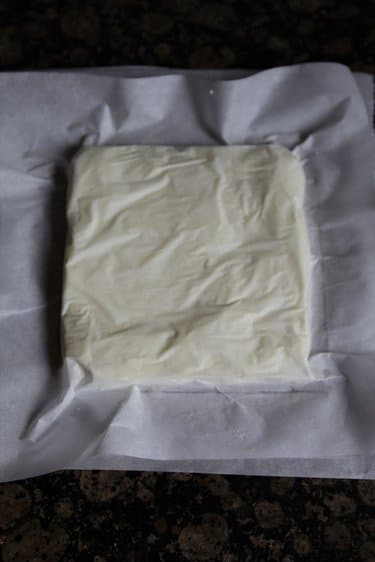
Mix all the ingredients for the dough either in a stand mixer or by hand. Use low-speed setting for 3 minutes until all the ingredients are well combined. Then use medium speed setting and mix for additional 3 minutes until the dough is smooth. (Do not make the dough into a tight ball). Grease a 10 inch pie plate or dinner plate and place the dough and flatten it, cover with plastic wrap so the dough doesn’t dry out. Let it refrigerate overnight. Cut out 2 pieces of parchment paper of 10 inches in square. Cut the cold butter into 1/2 inch thick slabs. Place the butter on one 10 inch parchment paper, cover with other 10 inch parchment paper and roll the butter on top of the parchment paper into 5 to 6 inch square. Pound the butter using the rolling-pin and flatten them to approximately 7 1/2 inch. Trim the edges of the butter to form a neat square. Let it chill in the refrigerator while you work on the dough.
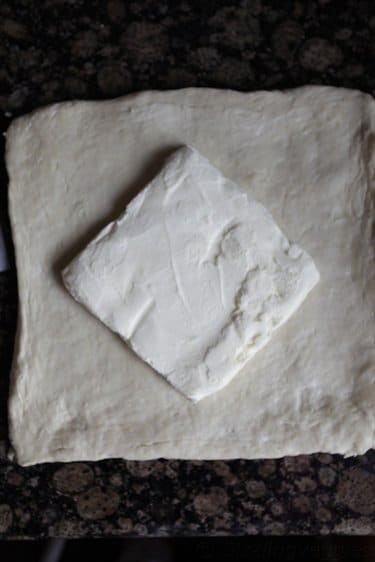
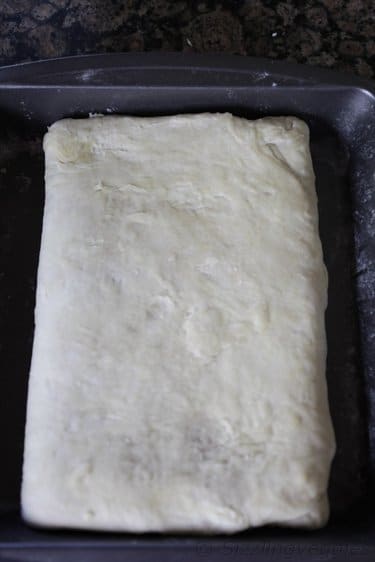
Remove the dough from the refrigerator, unwrap the dough and place it on a lightly floured work surface. Roll the dough into 10 1/2 inch square. Place the chilled butter on the center of the dough forming a diamond shape in the center. Fold one flap of the dough towards the butter. Fold the opposite flap to close on the first flap. Repeat with other two opposite flaps of dough, closing the dough on the butter like an envelope. Lightly press the dough to seal the open ends of the dough tightly.
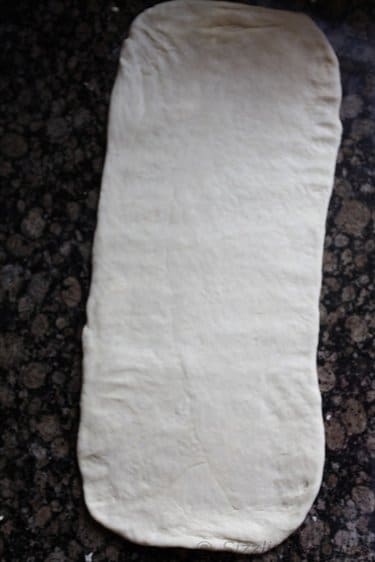
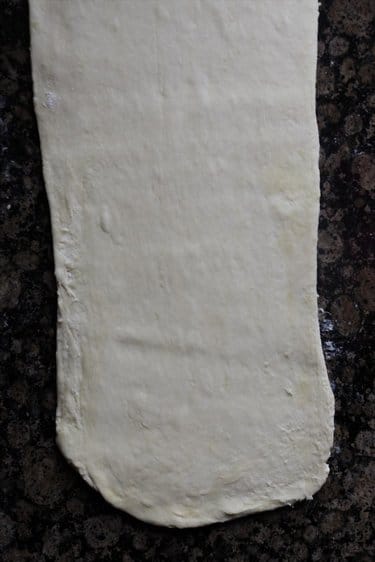
Lightly sprinkle flour on top and bottom of the dough and roll them to 8″x24″ rectangle.
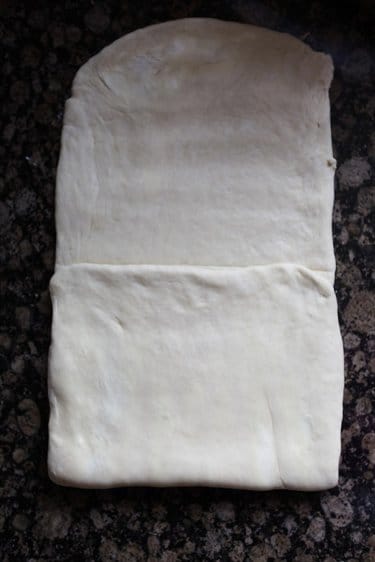
Mark 3 marks 1/3rd along the length of the dough. Since the rectangle is 24″ in length, mark 8 ” interval along the length making 3 marks. From one end of the short side, fold along the first 1/3rd mark. Now fold the other short side and fold over the folded side like a 3-fold letter. Put the folded dough on a floured baking sheet, cover with a plastic wrap and freeze for 15 to 20 minutes. Repeat the rolling and folding in the direction of two open sides until the dough is 8″x24″ and making 3 one-third marks and making a 3-fold letter. Cover once again with plastic wrap and freeze for 15 to 20 minutes. Repeat the process for the 3rd time and when you are done wrapping the dough in a plastic wrap and tucking the plastic wrap underneath on all sides, DO NOT freeze but refrigerate overnight.
Unwrap the dough on a lightly floured work surface. Cut the dough in half along the longer side. Refrigerate one half while working with other half. Slowly roll the dough into a 8″x22″ rectangle. The dough will need time to wake up, gently press with your hand and even though it may be quite hard to roll them initially, the dough will give way and become easier to roll after few minutes. Also note the dough may start to shrink back, if this happens roll the dough into thirds and refrigerate for 10 minutes and start again. Half way through the rolling process, lift the dough gently from the center to prevent the dough from shrinking at a later point.
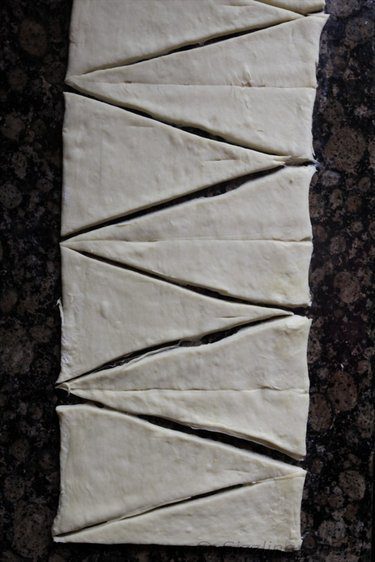
Trim the edges of the dough so that the length of the dough is about 20″ long. Mark at the top of the dough at 5″ intervals making a total of 3 marks along the length of the dough. Mark 2 1/2 inch mark from one end of the dough. With this mark as a guide make 5 inch marks along the bottom of the dough. There will be a total of 4 marks in the bottom. Using a sharp knife or a pizza cutter and with a ruler connect the first bottom mark to the top corner. Connect the next top mark to the same bottom mark making a triangle. Repeat the process and cut 7 triangles in all and two scraps of dough in the end.
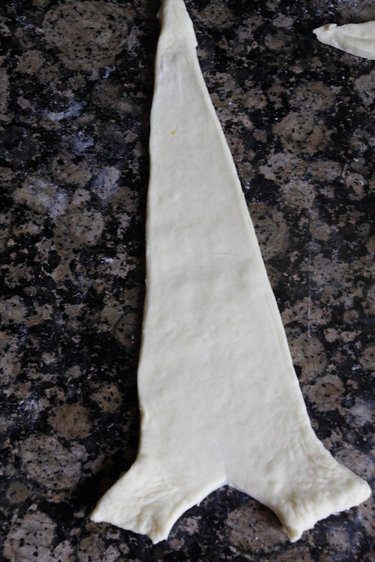
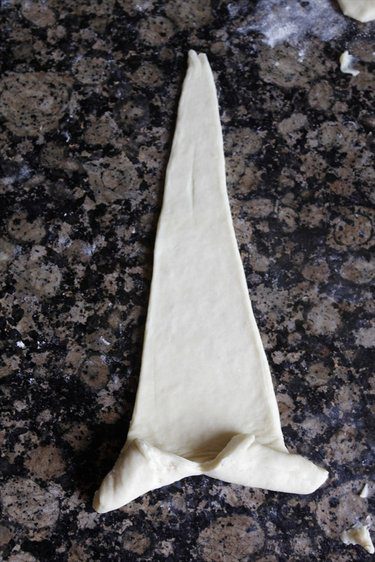
With the base of the triangle closest to you, flatten the triangle to about 10″ in height from the tip to the base. Make a 1/2″ to 3/4″ notch from the center of the base towards the tip.

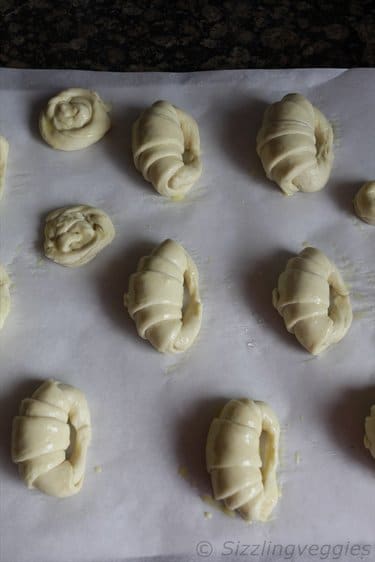
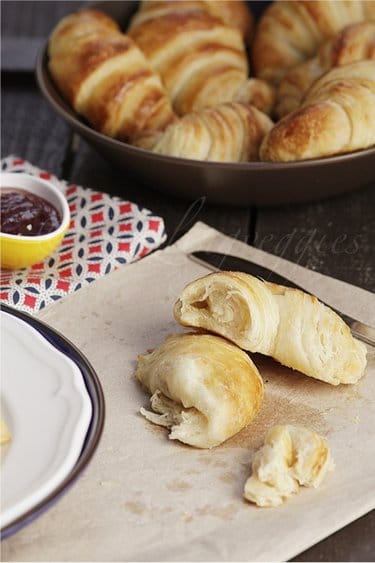
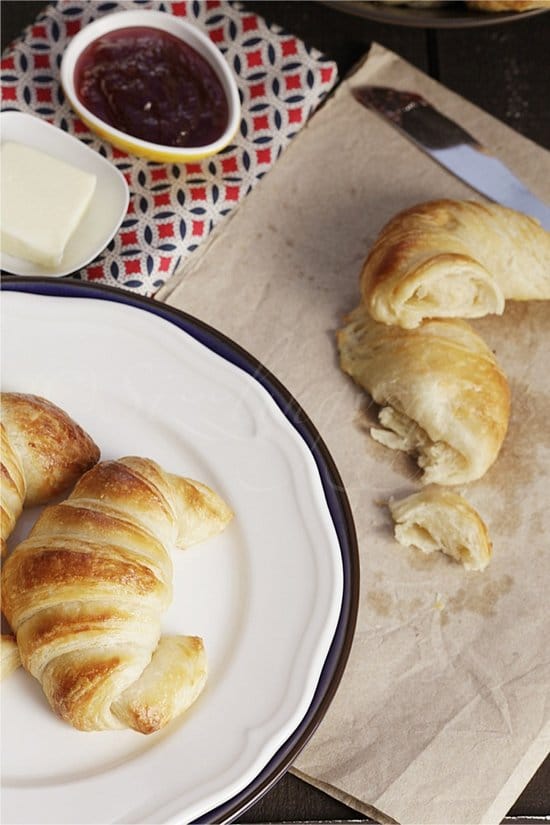
With one hand on each side of the notch, gently roll the triangle towards the tip, flare your hands outward so the notched legs become longer. Now bend the two ends/legs facing each other and press them lightly together to form a crescent shape. Repeat the shaping of the croissants with other triangles. Place the shaped croissants on a parchment paper lined baking sheet. Gently whisk one egg with 1 tsp of water to form an egg wash. Alternatively milk or cream can be used. Using a pastry brush, gently brush the egg wash on each of the croissants. Refrigerate the remaining egg wash or milk for later use. Place the croissants on a dry place for it to proof (I placed them in the oven with the light turned on). The croissants may need at least 1 1/2 to 2 hrs of time for proofing, sometimes it may take up to 3 hours depending on the weather and other conditions. The croissants are ready when they wiggle when you gently shake the baking sheet and you can see layers of dough from the side. Pre-heat oven to 220 C (425 F) on a regular oven or 200 C (440 F) in a convection oven. Brush the egg wash or milk/cream on each of the croissants lightly and bake them one tray at a time. Bake them for about 15 to 20 minutes. Half way through the baking process turn the tray around to ensure even baking. If the croissants seem to be browning quickly, lower the temperature by 10 c (25 F). Cool the croissants on wire rack. Serve warm. Enjoy!!!
Classic Croissants
Ingredients
-
- For the Dough
- All Purpose Flour — 4 cups
- Cold Water — 1/2 cup plus 2 Tbsp
- Cold Milk — 1/2 cup plus 2 Tbsp
- Granulated Sugar — 1/4 cup
- Unsalted Butter — 40 gm
- Instant Yeast — 1 Tbsp plus 1/2 tsp (scant)
- Salt — 2 tsp
For the Butter Layer
- Cold Unsalted Butter — 250gms
- Egg Wash (1 egg + 1 tsp of water) 0r 1/4 cup cold milk/cream
Instructions
-
- Day 1:
Make the Dough (and refrigerate overnight)
-
- Mix all the ingredients for the dough either in a stand mixer or by hand. Use low speed setting for 3 minutes until all the ingredients are well combined. Then use medium speed setting and mix for additional 3 minutes until the dough is smooth. (Do not make the dough into a tight ball). Grease a 10 inch pie plate or dinner plate and place the dough and flatten it, cover with plastic wrap so the dough doesn’t dry out. Let it refrigerate overnight.
Day 2:
Make the Butter Layer
-
- Cut out 2 pieces of parchment paper of 10 inches in square. Cut the cold butter into 1/2 inch thick slabs. Place the butter on one 10 inch parchment paper, cover with other 10 inch parchment paper and roll the butter on top of the parchment paper into 5 to 6 inch square. Pound the butter using the rolling pin and flatten them to approximately 7 1/2 inch. Trim the edges of the butter to form a neat square. Let it chill in the refrigerator while you work on the dough. (Note: The butter should be cold but pliable for you to be able to roll them.)
Laminate the Dough
-
- Remove the dough from the refrigerator, unwrap the dough and place it on a lightly floured work surface. Roll the dough into 10 1/2 inch square. Place the chilled butter on the center of the dough forming a diamond shape in the center. Fold one flap of the dough towards the butter. Fold the opposite flap to close on the first flap. Repeat with other two opposite flaps of dough, closing the dough on the butter like an envelope. Lightly press the dough to seal the open ends of the dough tightly.
- Lightly sprinkle flour on top and bottom of the dough and roll them to 8″x24″ rectangle. Mark 3 marks 1/3rd along the length of the dough. Since the rectangle is 24″ in length, mark 8 ” interval along the length making 3 marks. From one end of the short side, fold along the first 1/3rd mark. Now fold the other short side and fold over the folded side like a 3-fold letter. Put the folded dough on a floured baking sheet, cover with a plastic wrap and freeze for 15 to 20 minutes. Repeat the rolling and folding in the direction of two open sides until the dough is 8″x 24″ and making 3 one-third marks and making a 3-fold letter. Cover once again with plastic wrap and freeze for 15 to 20 minutes. Repeat the process for the 3rd time and when you are done wrapping the dough in a plastic wrap and tucking the plastic wrap underneath on all sides, DO NOT freeze but refrigerate overnight.
Day 3:
Divide the Dough
-
- Unwrap the dough on a lightly floured work surface. Cut the dough in half along the longer side. Refrigerate one half while working with other half. Slowly roll the dough into a 8″x 22″ rectangle. The dough will need time to wake up, gently press with your hand and even though it may be quite hard to roll them initially, the dough will give way and become easier to roll after few minutes. Also note the dough may start to shrink back, if this happens roll the dough into thirds and refrigerate for 10 minutes and start again. Half way through the rolling process, lift the dough gently from the center to prevent the dough from shrinking at a later point.
- Trim the edges of the dough so that the length of the dough is about 20″ long. Mark at the top of the dough at 5″ intervals making a total of 3 marks along the length of the dough. Mark 2 1/2 inch mark from one end of the dough. With this mark as a guide make 5 inch marks along the bottom of the dough. There will be a total of 4 marks in the bottom. Using a sharp knife or a pizza cutter and with a ruler connect the first bottom mark to the top corner. Connect the next top mark to the same bottom mark making a triangle. Repeat the process and cut 7 triangles in all and two scraps of dough in the end.
Shape the Croissants
-
- With the base of the triangle closest to you, flatten the triangle to about 10″ in height from the tip to the base. Make a 1/2″ to 3/4″ notch from the center of the base towards the tip. With one hand on each side of the notch, gently roll the triangle towards the tip, flare your hands outward so the notched legs become longer. Now bend the two ends/legs facing each other and press them lightly together to form a crescent shape. Repeat the shaping of the croissants with other triangles. Place the shaped croissants on a parchment paper lined baking sheet.
Proof the Croissants
-
- Gently whisk one egg with 1 tsp of water to form an egg wash. Alternatively milk or cream can be used. Using a pastry brush, gently brush the egg wash on each of the croissants. Refrigerate the remaining egg wash or milk for later use. Place the croissants on a dry place for it to proof (I placed them in the oven with the light turned on). The croissants may need at least 1 1/2 to 2 hrs of time for proofing, sometimes it may take up to 3 hours depending on the weather and other conditions. The croissants are ready when they wiggle when you gently shake the baking sheet and you can see layers of dough from the side.
Bake the Croissants (Final Step)
- Preheat oven to 220 C (425 F) on a regular oven or 200 C (440 F) in a convection oven. Brush the egg wash or milk/cream on each of the croissants lightly and bake them one tray at a time. Bake them for about 15 to 20 minutes. Half way through the baking process turn the tray around to ensure even baking. If the croissants seem to be browning quickly, lower the temperature by 10 c (25 F). Cool the croissants on wire rack. Serve warm. Enjoy!!!