Recently, I bought a bottle ofkaya from my regular kaya toast chain. Boy, was I in for a rude shock. Not only was the price upped, the kaya was also thinned out and watered down. I was so disappointed.
That was when I decided enough was enough, and made up my mind to make my kaya.
But first, I had to get past my phobia resulting from a bad experience 10 years ago. I was feeling adventurous one morning, and attempted to make my own kaya. The heavens must have rumbled (with laughter) because at that time, I was at the “instant noodles + fried egg” stage of my culinary journey.
Needless to say, it was a backbreaking session of slaving over the stove, and which yielded a miserable pot of curdled, lumpy coconut mush. Truly, fools rush in where angels fear to tread.
That was when I decided enough was enough, and made up my mind to buy my kaya.
Fastforward to today, and I have come full circle. I think the one thing which put me off trying again was the fact that it involved a lot of time spent in front of the stove, stirring and stirring. This time though, I pulled out my crockpot, like so many others have. Just google “crockpot kaya” and you’ll see all their fine examples.
The crockpot is your best friend when making kaya because it minimises the amount of stirring. It’s brilliant, really. Gosh, where have I been all these while? Oh, I know! Spending good money on buying kaya when I could have easily made my own. Sob. Well, better late than never.
Presenting … Kaya – The Painless Way.
Recipe
– 400ml thick coconut cream (I used Kara brand, one small packet is 200ml)
– 150ml fresh coconut cream, which I squeezed out from one coconut (you can use all packet cream if you don’t want to trouble yourself)
– 10 eggs, lightly beaten
– 450g regular fine sugar
– 10 pandan leaves, washed and tied into a knot
Yields about 900g of kaya. Halve the recipe for a smaller family, although you have to adjust your cooking time. Half is definitely not enough for me!
1. Mix coconut cream, sugar and eggs well. Try and dissolve as much of the sugar as possible, otherwise it will sink to the bottom and turn brown during cooking. Pour everything into a crockpot. Add in the pandan leaves. Set it to high and stir once when it starts to heat up. The first time I made this, I did not stir at all, and the kaya at the bottom turned slightly brown. It did not affect the colour or taste, though. But to be safe, just stir once or twice when it starts to bubble.
2. After 2 to 2.5 hours, you will get a lumpy looking custard. Remove the pandan leaves.
Eeeeewwwww! Lumpy, messy and watery. But this is normal.
3. I have seen quite a number of bloggers use handheld blenders to smoothen out all the lumps. But I don’t own one, so I used a wire sieve. Make sure you sterilise all your utensils beforehand.
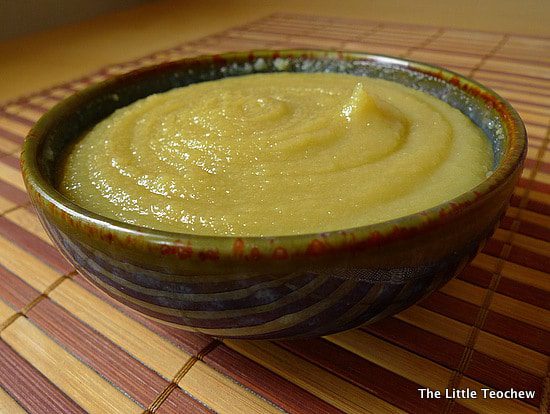
Scoop spoonfuls of kaya into the wire sieve and press over a clean bowl, like pureeing baby food. Don’t discard the water the accumulates during cooking. Instead, incorporate it with the lumpy kaya when you sieve. It makes the kaya smooth and spreadable. Scrape the kaya from the underside of the sieve and into the bowl.
4. Store the kaya in a sterilised bottle, but allow it to cool before putting on the cap and refrigerating.
There you have it. Kaya that is colouring-free, preservative-free, chemical-free and pain-free. And the best part? It’s so, so good!
In fact, I have already made it twice in a row. Here are some additional notes … you decide which you prefer.
First attempt: I used 100% packet coconut cream. The consistency was thick and creamy.
Second attempt: I used 400ml packet coconut cream + 150ml freshly squeezed coconut cream. The consistency was slightly thinner. I might try 100% fresh coconut cream next round. Stay tuned for the results! I’m still experimenting.
Bottled and ready to be given to some nice neighbours. They are small bottles, by the way. I’m not that generous. I still kept the lion’s share for myself.

