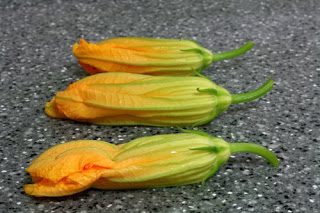
In working on the book, some of the wonderful recipe testers were making suggestions of other recipes to be included in my cookbook (that sounds so surreal when I say it) and a squash blossom recipe was one of the ideas. That’s all it took for me to try to get my hands on some.
This is the first year I’ve ever played with squash blossoms. It turns out that one of the farmers (read: the only vegetable farmer!) at our local farmer’s market is happy to sell them as long as you order ahead. After a few test batches, this is what I came up with.
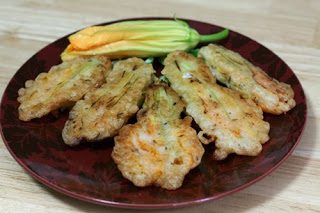
Cashew Cheeze Stuffed Squash Blossoms
Makes 8
Cheeze:
1/2 cup raw cashews
1 tablespoon white miso
2 teaspoons nutritional yeast
1 tablespoon white vinegar
1 teaspoon capers plus 1 teaspoon caper juice
In a small bowl, soak the cashews in 1 cup of water overnight in the refrigerator. The next day, drain the cashews and process them in whatever works for you. My blender (aka Linda Blair) didn’t do the trick, but my Magic Bullet did. Grind them up then add the rest of the ingredients to the cashews. Process them until smooth and set aside. You can do this ahead of time or right before filling the blossoms. (Side note: this cheeze is great on crackers, too.)
For the blossoms:
8 squash blossoms
1/2 cup flour
1/2 teaspoon salt
1/4 teaspoon dried thyme
1/4 teaspoon onion powder
Pinch of sugar
1/2 cup cold club soda
1/3 to 1/2 cup cold water
oil for frying
Gently open the squash blossoms and stuff with about 1 tablespoon of cheeze filling. Somewhere on the net I had read that you could kind of twist the ends of the blossom closed. That worked well….for one. But others tore. So instead I gently pasted them together by letting some of the cheeze be between the leaves rather than just in the blossom cavity. Fill them all, then start the batter.
Heat about 1/8 inch of oil in a large skillet over medium to medium high heat.
Now, for the batter. You will have extra, but it’s easier to coat them this way. In a bowl just bigger than the blossoms are across (so you have more depth to the batter), combine the dry ingredients. Mix them together with a fork, then add the soda and 1/3 cup cold water. If the mixture is too heavy, add some additional water. Dip the blossoms in the batter, turning to coat them well. Place in the hot oil and fry until golden, about 5 to 7 minutes, turning as needed so all sides brown. Be sure to adjust your heat if it is getting too hot or too cool. Drain on a paper covered baking sheet and serve hot.
For what it’s worth, I actually pinched out that nubby inside part in some of my early batches, but didn’t bother in later versions. I couldn’t tell the difference and decided it wasn’t worth the effort.
I’d always thought these would be incredibly hard to make and was surprised that the technique really isn’t as challenging as I thought. The combination of the creamy cheezy filling, the delicate blossom and the amazing crisp outside combine to make something so much bigger than the parts. These are something I’ll make again and again.
Kirsten is the tester who suggested these and you can check out her blog here.
Don’t forget– a new book give-away is coming soon!