I love baking bread. More, I love making anything that takes the most basic of ingredients and turns them into far more than the sum of their parts. It’s not just in cooking—yarn becomes a scarf, while fabric, thread, and buttons become a dress. But there’s something really special about these transformations in their kitchenly incarnations. Milk and bacteria become tangy yogurt. Cream and salt become butter and buttermilk. Flour and yeast, salt and water, become bread. These transformations are pure magic. And kitchen magic is my favourite kind.
There’s more than fascination going on here. Yes, I love recreating the feeling I had in kindergarten when we each got to shake our own tiny jars of cream into butter, and then eat it spread on saltine crackers. But I also treasure both knowledge and control. I want to know exactly what goes into my food. But even more, I want to know how to make something just as good (if not better) than what I can buy. I want to be able to control precisely what ingredients I use, to know where they come from, and to exert both knowledge and control to create something that’s exactly as I want it. Tamar Adler is exactly right when she argues that this exertion of control is one of the best ways to make ourselves feel more human.
When we cook things, we transform them. And any small acts of transformation are among the most human things we do. Whether it’s nudging dried leaves around a patch of cement, or salting a tomato, we feel, when we exert tiny bits of our human preference in the universe, more alive.
I’ll also admit that frugality is certainly part of the equation—for why would I spend five dollars on a loaf of bread when I can make it myself for about a tenth of that?

I often wonder where this pioneer spirit, one that so many of you share, comes from. Why do it ourselves—make our own jam, bread, cheese, yogurt—when there are so many people already out there doing it for us? Knowledge and control is certainly part of the reason that I choose to make things rather than buy them. But more, I think it’s a reaction against too many options, too many people, too great a distance between what is on my table and where it originated. We’ve become disconnected from our food—from how it grows, how it’s produced, how it gets from the field to our tables. Doing it myself is a way to reconnect with food on a very physical level. I can’t help but believe that bread tastes better, and that I savour it more, because I’ve had my hands in it—kneading it, shaping it, collecting a fine film of flour that seeps into the creases of my skin. And while I don’t eat meat, baking bread—and earning the knowledge about how it goes from flour to loaf—seems akin to visiting a farm and experiencing, in a very real way, that chicken doesn’t grow in the Styrofoam trays that end up in the supermarket fridge. When I was slowly becoming vegetarian, knowing more about my food and where it came from was directly connected to the increasing quality of the food I ate—I went from eating factory-farmed meat to humanely raised and slaughtered meat to no meat at all—and the enjoyment I took in it. Same goes for bread. Same goes for anything.
Another reason I love baking bread is that it’s so congenial to my writerly life. Most days of the week, I sit in my office and write about poetry, or conduct research, for most of the day. As much as I love my office chair, all of that sitting is neither desirable nor good—and it’s also not doable, since I am entirely incapable of keeping myself in my chair for any long stretch. So, most mornings, I start something cooking or baking as I boot up my computer—something that will require me to get up from my desk, go downstairs to the kitchen, and spend a couple of minutes tending to something other than poetic tone and tense. Bread is the best for this. It always seems to work out that just as I need a break, the bread needs kneading, or taking out of the oven, or tasting. And when my day is done, I have the satisfaction of a small, tangible accomplishment—a loaf of bread, sitting on my counter—to go along with the less-immediate pride of knowing that I’ve made progress on a book that won’t be done until sometime next year. They’re a good counterpoint, words and wheat.
A Simple Whole Wheat Loaf
Adapted from Peter Reinhart’sWhole Grain Breads
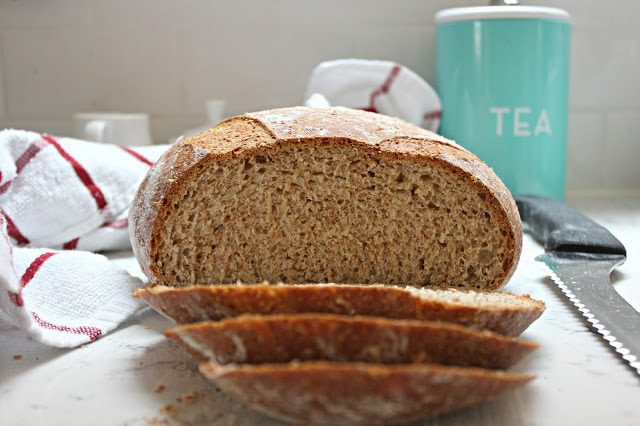
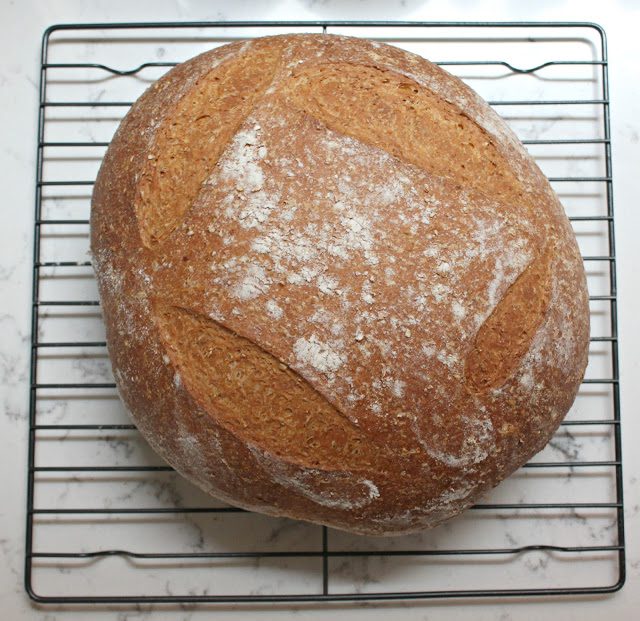
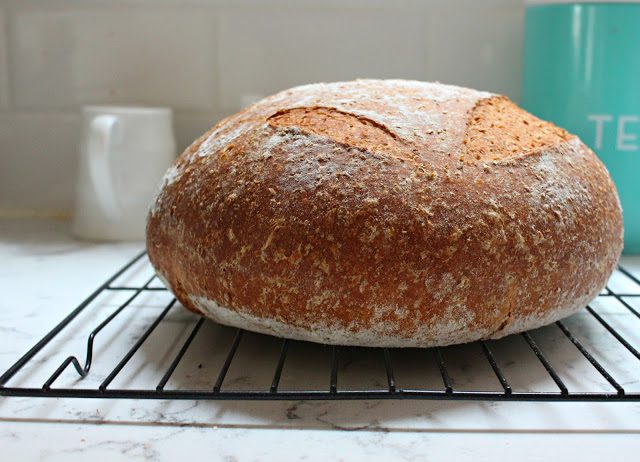
Before the recipe proper, just a note on baking whole wheat bread. Have you seen About a Boy? In particular, the scene where Nicholas Hoult accidentally kills a duck with the leaden loaf his hippie mother sends with him on a picnic? You shouldn’t judge her too harshly. If you’ve ever tried baking with 100% whole grains, you know how easy it is to pull something out of the oven that’s more door stop than show-stopper. This recipe won’t kill any ducks, I promise you. This is in large part due to Reinhart’s epoxy method, which gives a good part of the flour an overnight soak in some liquid, so that there’s nothing dry or sawdusty to weigh things down. The overnight rise also means that there’s not actually that much kneading—because I don’t want to spend all day fussing over bread—and it has wonderfully developed flavour. It bakes up into a loaf that’s both solid and light, fluffy and yet unmistakably made with something that’s got some fibre in it. Because this is an enriched dough—not a lean one, like a baguette, which is made with only flour, yeast, and water and bakes up crunchy—the crust is golden, yet has some give. I baked mine as a boule shape, but it would suit a loaf-pan even better. And it makes glorious, fragrant toast—especially with some nut butter to play up the nuttiness of the flour. If you love salty-sweet like I do, you can’t go wrong with a slice slathered in good butter and then spread with your favourite jam. Mine’s strawberry, although lemon marmalade (which I’ll have a recipe for next week) is a very close second.
Makes one loaf.
Soaker
227 grams (1 ¾ cups) whole wheat flour
4 grams (1 teaspoon) flaky salt
198 grams (3/4 cup plus 2 tablespoons) kefir or thin plain yogurt (or you can use milk, non-dairy milk, or buttermilk)
Biga
227 grams (1 ¾ cups) whole wheat flour
1 gram (1/4 teaspoon) instant yeast
170 grams (¾ cup) room-temperature water
Final Dough
All of the soaker, cut into 12-ish pieces and sprinkled with a bit of extra flour to keep them from sticking together
All of the biga, cut into 12-ish pieces and sprinkled with a bit of extra flour to keep them from sticking together
56.5 grams (7 tablespoons) whole wheat flour
5 grams (1 slightly heaped teaspoon) flaky sea salt
7 grams (2 ¼ teaspoons) instant yeast
42.5 grams (2 ¼ tablespoons) maple syrup
28.5 grams (2 tablespoons) grapeseed (or other flavourless vegetable) oil
Extra flour for dusting and adjustments
For the soaker: With a large spoon, stir together all of the soaker ingredients in a large bowl (I used the bowl of my stand mixer, since I knew I was going to have to dirty it the next day anyway) until all of the flour is incorporated and a dough forms. Depending on how thick your kefir/yogurt is, you might need to add an extra splash of water to make everything come together. Cover the bowl with plastic wrap and leave at room temperature overnight (you can leave it for up to 24 hours, so don’t worry if you don’t plan to bake until the evening).
For the biga: Stir together all of the ingredients in the same way you stirred together the soaker. Knead the dough together for about two minutes in the bowl—you’re making sure that the yeast, in particular, is evenly distributed. The dough should be very tacky, like the glue on a post-it note. Let it rest for about 5 minutes, then knead again for another minute—wet your hands if you find the dough is sticking a lot. Wipe out the bowl, oil it lightly, and return the dough (or you can put it in a freezer bag you’ve misted with oil); cover the bowl and refrigerate overnight or up to three days. Take the biga out of the fridge about two hours before you plan to bake your bread, so it can warm up a bit.
For the final bread: Put all of the final dough ingredients (except the extra flour) in the bowl of your stand mixer. Using the paddle attachment, mix on low for about 1 minute; add extra flour or water as needed until the dough is soft and slightly sticky (it’ll be sticker than the biga was).
Increase the speed to medium-low, and mix for 2-3 minutes (scrape down the bowl and paddle occasionally), until what was three separate things—soaker, biga, and final dough ingredients—is now one cohesive bread dough.
Dust your countertop with flour, then roll the dough in flour to keep it from sticking to your hands. Knead the dough by hand for 3-4 minutes—a great arm workout—, adding more flour as needed until the dough is tacky (that post-it note texture from before) but not sticky. Shape the dough into a ball and let it rest for 5 minutes while you wipe out the biga bowl and re-oil it.
Knead for one more minute to strengthen the gluten and make sure that the dough has the right texture—tacky, not sticky, and not dry. Shape the dough into a ball, roll in the oiled bowl to coat, cover with plastic wrap, and let rise for between 45 minutes and an hour. (If your kitchen is cold, like mine, wrap the bowl in a couple of tea towels and expect for it to take an hour, or longer.) The dough will be about 1 ½ times its original size.
Shape the dough into a loaf shape or a boule. For a loaf, pat the dough into a rectangle about the width of your loaf pan; roll the dough into a spiral from the bottom to top, pinch together the seam, then place the dough in a greased loaf pan, seam down. For a boule, grab pieces of the bottom edge of the round dough ball and bring them in toward the centre of the bottom, doing this all the way around, so that the dough has a tight top surface. Put the ball on the counter, bottom down, and pat and rotate the dough so that the ball is an even circle. Dust a baking sheet with flour or semolina, and lay the dough on it to rise. Cover the pan with lightly-oiled plastic wrap (so it doesn’t stick, and the dough doesn’t dry out). Let the dough rise again for another 45 minutes to an hour, or until 1 ½ times its original size.
Preheat the oven to 425 degrees. Put an oven-proof metal pan on the bottom rack to heat up; this will be your steam pan. When the oven is hot and the dough is ready to bake, score the boule with a sharp knife or razor blade (see photos for an example). Place the dough in the oven and pour a cup of hot water into the steam pan; lower the temperature to 350 degrees and bake for 20 minutes. Rotate the pan 180 degrees, and continue baking for another 20 to 30 minutes, or until the bread is a deep golden brown on all sides, it sounds hollow when thumped on the bottom, and when the internal temperature is at least 195 degrees in the centre of the loaf (I use a meat thermometer).
Remove the bread from the pan immediately and cool on a rack before serving. At least an hour is a recommended wait, but I’m normally into it long before that (just use a sharp serrated knife and a light hand when slicing, so that you don’t squash the insides) so that I can eat the first slice with butter melting into it.